The tlwebadm interface consists of several modules which address different aspects of ThinLinc configuration:
System Health, for viewing information about ThinLinc master and agent services, and testing user or group lookup performance. See Section 17.3.1, “ The System Health Module ” below.
Status, for viewing information such as license usage, server load and sessions. See Section 17.3.2, “ The Status Module ” below.
VSM, for viewing information and managing ThinLinc master and agent services. See Section 17.3.3, “ The VSM Module ” below.
Profiles, for viewing and configuring profiles. See Section 17.3.4, “ The Profiles Module ” below.
Locations, for viewing and configuring printers and terminal locations. See Section 17.3.5, “ The Locations Module ” below.
Desktop Customizer, for configuring desktops. See Section 17.3.6, “ The Desktop Customizer Module ” below.
Application Servers, for viewing and configuring application servers.
Documentation Center, a module containing documentation and other useful information.
These modules are described in more detail in the following sections.
The System Health module allows you to check the running state of the ThinLinc services VSM Master and VSM Agent. There is also a tool to perform a user or group lookup which reports the time for the lookup.
VSM Master reports current running state of VSM Master service.
VSM Agent reports current running state of VSM Agent service.
Users and Group Lookup allows you to test performance of user and group lookup on the system.
Fill in values for username and/or group and click the button to perform a lookup.
The Status module allows you to view or manipulate the following aspects of ThinLinc, by selecting the relevant submenu:
Licenses allows you to view current and historic license usage, as well as the current number of licenses.
Load allows you to check the current server load on both ThinLinc and application servers.
Sessions allows you to terminate, shadow or view details of sessions. This feature is described in more detail in the next section, Section 17.3.2.1, “ The Sessions Menu ”
When you select the sessions menu, a table with all currently active users is displayed. To perform additional tasks, click on the corresponding user name. This will bring up the session details page, which displays all the session parameters for each session the user has running. The information table is described below.
Agent Server : The DNS host name of the server that is hosting this session. If you only have one ThinLinc server, this server will host all sessions. If you have several ThinLinc servers in a cluster, new sessions will be created on the server with the lightest load.
Display Number : Each session on a certain server has a unique number, the X Window System display number. Display zero is reserved, and never used for ThinLinc sessions.
Terminal ID : An identification of the thin terminal. This is the terminal's ethernet hardware address (MAC address).
Framebuffer Size : The size (resolution) of the active session.
Local Screen Size : The size (resolution) of the terminal's screen.
Session process ID : The PID (process identification number) of the tl-session process, which is the parent for all processes belonging to a certain session.
Command : The command line that was specified when starting this session. This is usually empty for full desktop sessions.
Below each table, there are two buttons:
: By clicking this button, you can terminate a session immediately. Caution: This can lead to data loss, since applications running on the ThinLinc servers may not hold unsaved data.
: This button will generate a ThinLinc "launch file" (see Section 8.6.1, “ Launching the Native Client From a Web Page ”) that starts the native ThinLinc client, preconfigured to shadow the current user.
Note
The user will not be informed that shadowing is in progress, unless tl-shadow-notify is enabled.
VSM contains information about VSM Master and Agent services. This module allows you to start or stop the services, and modify a subset of the configuration options.
Home allows you to view current status of VSM services.
VSM Master allows you to start or stop the service, and modify a subset of the configuration options.
VSM Agent allows you to start or stop the service, and modify a subset of the configuration options.
On this page you can start or stop VSM Master service. There are also a subset of configuration options available for configuration of the service.
Service Status gives you the ability to start or stop the VSM Master service.
Sessions per user allows you to configure how many session are allowed per user.
A value of zero means no limit and will give unlimited sessions per user.
Allowed Groups allows you to configure which groups should be given access to connect to ThinLinc.
If no groups are specified, all users will have access to connect to ThinLinc
Allowed Shadowers allows you to configure which users should be able to shadow other ThinLinc sessions.
Click the button when you want to save your changes to the configuration files.
Note
You need to restart the service to apply your changes.
On this page you can start or stop the VSM Master service. There are also a subset of configuration options available for configuration of the service.
Service Status gives you the ability to start or stop the VSM Agent service.
Agent Hostname allows you to configure the hostname that clients are redirected to.
Note
This configuration is needed if running ThinLinc in a NAT environment. See Section 3.3.4, “ ThinLinc in a NAT/Split-DNS Environment ” for more information.
Extra Arguments to X Server allows you to configure additional arguments to the Xserver (Xvnc) for new sessions that are started.
Click the button when you want to save your changes to the configuration files.
Note
You need to restart the service to apply your changes.
On this page you can modify text shown in the profile chooser, and manage profiles. You can create or delete a profile and configure the profile order.
Introduction Texts allows you to modify and manage translation of texts used in the profile chooser.
Profile List allows you to configure the available profiles and their order.
Introduction texts contains translation tables for greetings and introduction texts. There is also a configuration option to enable or disable the use of introduction texts.
Greeting Text the text to show at the top of the profile chooser.
Show Introduction disable or enable the introduction text which is shown to the user before the profile selection dialog.
Introduction Text the text to show before presenting the list of profiles.
To add a new translation, fill in language code and the translated string. Click the button to save the new translation and add it to the translation table.
To delete a translation select the row using the checkbox in Delete column of the translation table. Click the button to carry out the actual deletion of selected rows.
The Profile List module contains functionality to manage your profiles. You can change the default profile, or create new and edit existing profiles. You can also change the order of profiles.
Default Profile allows you to specify the default profile to be selected in the profile chooser.
Profile List allows you to modify profiles and their order, or create new profiles.
Create a new profile by clicking the button. If you want to edit an existing profile, click the profile name in the table of available profiles.
When creating a new or editing an existing profile a form is displayed. This form is shared between both modes and each field details are described below.
Identification
An unique string identifier for the profile which is used when referencing this profile.
XDG Session Desktop
The system desktop session configuration that this profile should be connected to.
Default Name
A name for the profile which is displayed in the profile chooser.
Availability
This will make the profile available to be selected and used. If you uncheck it will not be shown to the user in the profile chooser.
Take Description From
The description is shown in the profile chooser when a profile is selected. This field can be a static text which is defined in the input field Default Description .
: This will take and use the output of defined Test Command as description for the profile.
: This will use the text defined in the Default Description field below.
Default Description
A text used as description for the profile. This is text is used if Take Description From above is selected to use the manually defined text.
Icon Path
A filename of the icon to use in the profile chooser.
Screenshot Path
A filename of the screenshot to use in the profile chooser.
Command Line
This command is used to start up a session, it might be a simple xfce4-session or one of shipped binaries like ${TLPREFIX}/bin/tl-run-windesk -G wts_farm.
Test Command
This command is evaluated and if it returns true, the profile is shown to the user. If the command evaluates as false, the profile will not be shown in the list of available profiles for the user.
ThinLinc includes the tool "tl-memberof-group" which may be used to test memebership of groups. You can use this tool as test command, such as ${TLPREFIX}/bin/tl-memberof-group my_profile_access_group. This example will give memebers of group my_profile_access_group access to the profile.
If you only want to give a specific user access to the profile you may specify test ${USER} = user.
When you have filled out the form, or changed any fields, click button at the bottom of the form to save your changes into the configuration file.
To delete a profile click the profile name in table of available profiles. Then click the checkbox at the bottom of the form to verify your intention about deletion of the profile. Complete the deletion by clicking the button.
Locations contains information about locations where terminals and printers reside. A location can be a room, a floor, a house or some other type of geographical delimitation.
Every terminal should be assigned as a member of a location. In addition to terminals, printers may also be assigned to locations.
Terminals contains necessary information about all terminals. The most important information here is every terminal's interface hardware (MAC) address.
Each terminal should be entered as described in this section. Enter the terminals module by clicking on the menu item. You will be presented with a list of currently entered terminals. This could be something like the example in Figure 17.1.
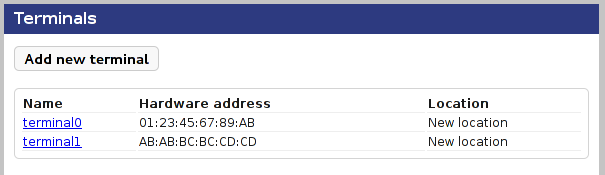
Figure 17.1 shows a system with a total of two terminals.
To edit a terminal, click on its name in the list.
To add a new terminal to the list you press the button. This will bring up an empty terminal edit form. See Figure 17.2 for an example.
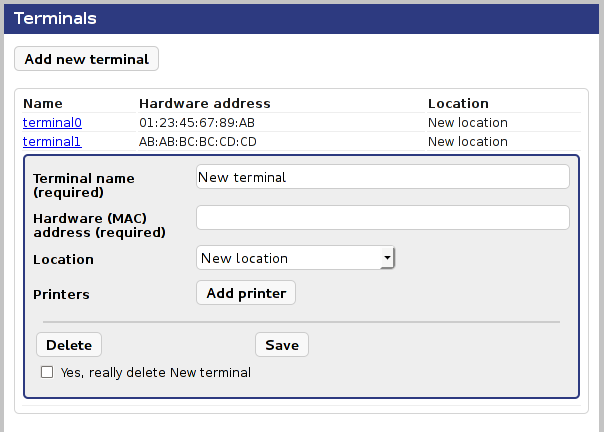
There are three editable fields in this view, Hardware (MAC) address , Terminal name and Location . They are described in Table 17.1 below.
To save changes, press the button. When you have pressed the button you will see that the Hardware (MAC) address field will change from being an editable field to become a static text label. To assure data integrity between the modules you aren't allowed to change this field after it's added.
When a new terminal is saved or when clicking an existing in the terminals list, there will be three buttons inside the form. The button is used to save changes made to the terminal. The button deletes the currently viewed terminal. The button will add a new printer field to the form.
Table 17.1. Terminal properties
| Name | Description |
|---|---|
| Hardware (MAC) address | hardware (MAC) address of the main interface of the terminal. This field is important! Without a correct value the nearest printer won't work! |
| Terminal name | Name of the terminal. Could for example be the terminal's DNS name or a name following a naming scheme that identifies the terminal. |
| Location | Which of the locations, entered in the Locations module, this terminal belongs to. |
It is also possible to add a printer to a terminal in the terminal module. This can be used if a terminal has its own printer or is closer to another printer than the ones assigned to this terminals location. You should use this feature moderately since it may cause more administration.
To add a printer you do exactly as in the Locations menu. Click the button, select the printer in the pop-up menu and then press to make sure that the settings are stored. To delete it, check the relevant Delete checkbox(es) for the printer(s) you wish to remove, and click .
To edit a location, click on its name in the list.
To add a new location to the list you press the button. This will bring up an empty location edit form. See Figure 17.3 for an example.
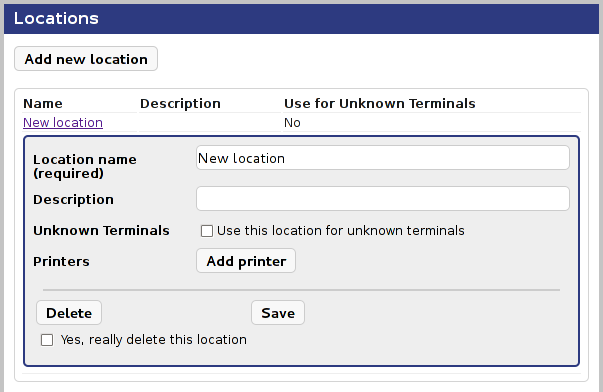
Fill the Name and Description fields with relevant information. Check the checkbox if this location is to be used for unknown terminals when using the printer access control feature (see Section 5.5, “ Printer Access Control ” for details).
To save changes, press the button. When you have pressed the button you will see that the Name field will change from being an editable field to become a static text label. To assure data integrity between the modules you aren't allowed to change the name of an item after it's added.
The button deletes the currently viewed location, but only if the confirmation checkbox is also checked. The button will add a new field to the form, a drop-down menu with all possible printers. An example of this can be seen in Figure 17.4.
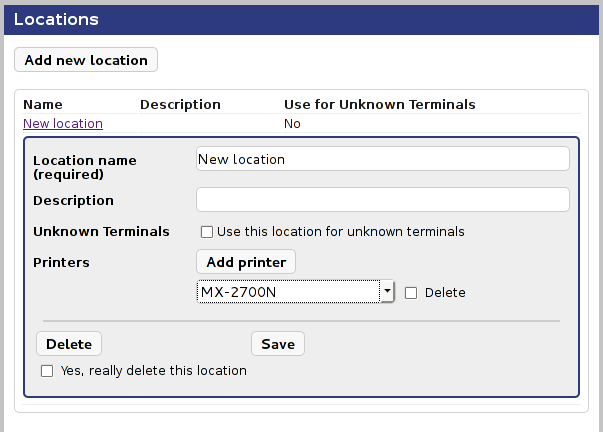
The Printer field above has the printer europa selected. Remember to save the changes if you change printer! You can assign more printers to this location by clicking again to bring up another printer line. To remove a printer you select the Delete checkbox corresponding to the printer(s) you want to delete, and click to apply the changes. The printer(s) will disappear.
Note
Printers contains entries for all available printers. These entries are just shadows of the real CUPS (Common Unix Printing System) printer system entries. This means that you first need the printers to be installed in the CUPS printer system and then added to this list.
The ThinLinc Desktop Customizer is described more fully in its own chapter, Chapter 18, Building Custom Linux Desktops with the ThinLinc Desktop Customizer . Links to sections of this chapter pertaining to the respective menus of the Desktop Customizer Module are provided below for convenience.
For information on configuring Application Groups using TLDC, see Section 18.2.5, “ Defining Application Groups ”
For information on configuring Manual Applications using TLDC, see Section 18.2.3, “ Handling Applications ”
For information on configuring System Applications using TLDC, see Section 18.2.1.1, “ Applications ”
For information on configuring Menu Structures using TLDC, see Section 18.2.4, “ Defining a Menu Structure ”
The Application Servers module provides a way to define application server groups via tlwebadm. For more information on application server groups, see Section 14.2.4, “ Parameters in /appservergroups/ ”.
This menu allows you to configure UNIX-based application server groups, for publishing applications via X11-forwarding. The default installation provides a single example server group, as shown in Figure 17.5.
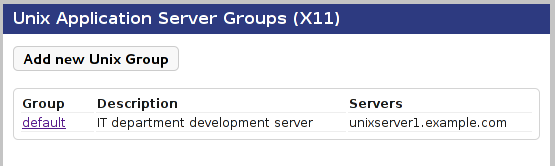
To edit an existing server group, click on the name of the group in the list. To add a new server group, click on the button - Figure 17.6 shows the page for adding new UNIX server groups.

The descriptions of the fields are provided in Table 17.2 below.
Table 17.2. UNIX Application Server Group Fields
| Name | Description |
|---|---|
| Group name | A unique name for the application server group. |
| Description | A description of the application server group. |
| Servers | A space-separated list of servers (IP addresses or resolvable hostnames) which will be members of this application server group. |
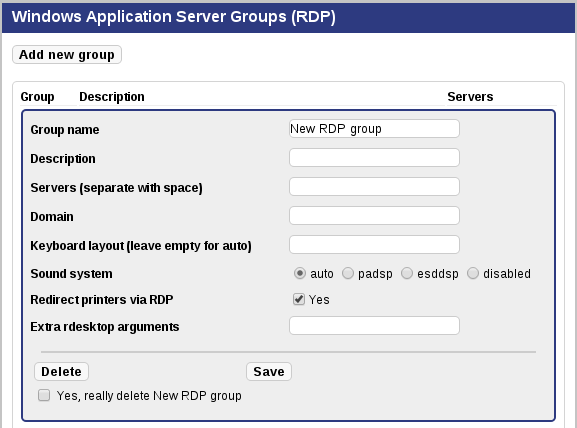
This menu allows you to configure Windows-based application server groups, for publishing Windows applications and desktops via RDP.
To edit an existing server group, click on the name of the group in the list. To add a new server group, click on the button - Figure 17.7 shows the page for adding new Windows server groups.
The descriptions of the fields are provided in Table 17.3 below.
Table 17.3. Windows Application Server Group Fields
| Name | Description |
|---|---|
| Group name | A unique name for the application server group. |
| Description | A description of the application server group. |
| Servers | A space-separated list of servers (IP addresses or resolvable hostnames) which will be members of this application server group. |
| Domain | The Windows domain, if any, to specify when connecting. |
| Keyboard layout | The keyboard layout to use for this server group. |
| Sound system | The sound system to use for this server group, or select "disable" to disable sound. |
| Redirect printers via RDP | Check this box to share printers via RDP from the ThinLinc server. |
| Extra rdesktop arguments | Any extra arguments you wish to give to rdesktop can be entered here. |