Using the ThinLinc Desktop Customizer, the system administrator can decide what applications should be available in the menu and/or on the desktop for specific users or for users that are members of some Unix group. The ThinLinc Desktop Customizer is configured via a web interface, part of the ThinLinc Web Administration. Chapter 17, Administration of ThinLinc using the Web Administration Interface describes the interface in general, this section will describe the Desktop Customizer part of it.
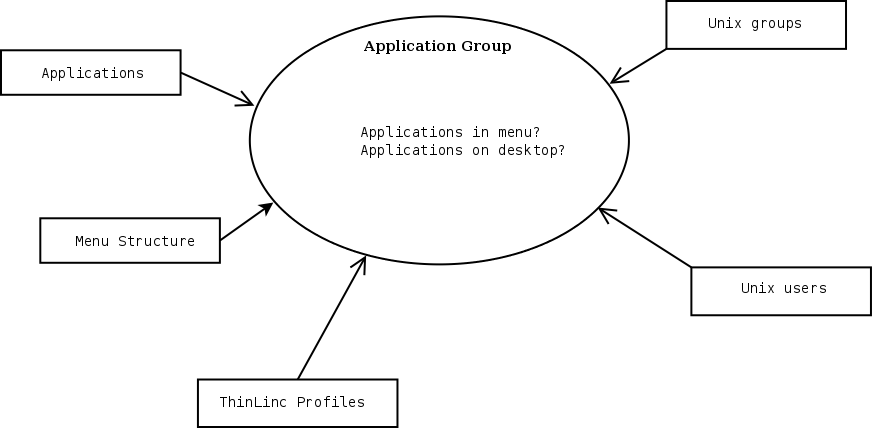
The main concept in the ThinLinc Desktop Customizer is the Application Group. The Application Group combines data about applications, a menu structure, Unix groups and users, and some other settings.
The Applications referred to in the Application Groups are found by scanning the space-separated list of directories defined in the Hiveconf parameter /utils/tl-desktop-customizer/xdg_data_dirs for files named *.desktop. The files are read according to the Freedesktop.org Desktop Menu Specification. The TLDC scans the directories in the same way that KDE will do when building the menu.
Some applications are marked by the system to be shown only for root, or only in either Gnome or KDE. On SuSE, there is also a X-SuSE-Unimportant parameter in some *.desktop files, which will make the KDE packaged with SUSE hide the application. TLDC handles this by adding a comment to the application in the applications listing, and in the selectboxes used when creating application groups.
In addition to the desktop files automatically found, it is also possible to manually define applications. This is needed for example when an application without a *.desktop-file has been installed, when an application has been installed in a non-standard location, or when the applications are available on application servers and should be run for example via tl-run-winapp.
Each Application Group can add applications to a specific place in the menu structure. The available menu structure is edited in the "Menu structure" part of the web based administration interface.
An Application Group is used by zero or more Unix groups and by zero or more specific users. An example would be an educational environment. Let's say that all pupils attending the class "biology 4" are members of the Unix group "bio4". By creating an Application Group named "Biology 4" with all applications that are specific to the biology class, and then adding the "bio4" Unix group as one of the groups that should be assigned the "Biology 4" Application Group, all students attending the class will automatically get the applications specific to the biology class in their menu. By adding the teacher of the class as a specific user, he/she as well will also get access to the applications.
The Daily use of the TLDC consists of one or several of the following steps:
Create an Application
Create a folder in the Menu Structure
Bind one or several applications to a folder in the menu structure, using an Application Group
In the following sections, we will more thoroughly describe the different actions that may be needed.
The handling of applications is normally the first step in using the TLDC. Click on the "Applications (Manual)" link in the TLDC, and you will enter a view where the applications you've defined manually are listed. Several example applications are included with ThinLinc at installation. By clicking on the text "Applications defined by system", you can also see what applications are found automatically by scanning, as described in Section 18.2.1.1, “ Applications ”.
If the application you want to add to a menu or to the desktop is not found among "Applications defined by system", you need to define it manually. This is the case for applications installed without adding a .desktop file in the correct location, or for applications that are run by connecting to an application server, for example a Windows Remote Desktop Server.
Definining applications manually is done by clicking on the button "Add new application" (located at the top of the list of applications). This leads to a page where you can define the following properties for the new application:
Default Application Name
This is the name of the application. It's the name that is written next to the icon (if any), in the menu, and under the icon if the application is to be added to the desktop.
The Default Application Name is used if there is no name defined for the language in use when the application is shown, or if the language is english.
Application Name (<language-code>)
This is the name of the application in the language with the RFC1766 language code <language-code>. This name is shown if the locale is set to that language when the menu or desktop is shown.
The languages that should be configurable are set by editing the space-separated list in the parameter /utils/tl-desktop-customizer/desktop_languages. The default value of this parameter is sv, which means that the TLDC will allow you to set the default name and the name in swedish.
Command
The Command field is divided into three sections. Which one to choose depends on which kind of application you are adding.
Command Run on ThinLinc Server
Select this radio button if you are adding an application that is executed on the ThinLinc server. Enter the path to the command followed by any arguments in the Command box. The input box follows bourne shell syntax rules.
Example:
"/usr/bin/my program" --fullscreen --title "My title"
Command Run on Windows Remote Desktop Server in SeamlessRDP mode
Select this radio button if you are adding an application that is run on a Windows Remote Desktop Server in SeamlessRDP mode. In SeamlessRDP mode, an application running on a Windows server can open several windows on the ThinLinc desktop, and windows can be resized dynamically. Applications defined this way are run via the command tl-run-winapp-seamless.
Enter the path to the command on the Windows Server's filesystem in the Command on Server input box. If the path contains spaces, quote the entire path with double quotes.
Example:
"C:\Program Files\My Vendor\My Program.exe" %TEMP%
Choose which application server group should be used to run the command in the selectbox labeled Application Server Group. By having several application server groups, you can have several groups of Windows servers for different purposes, with individual load balancing between the servers in each group.
Add any extra arguments to tl-run-winapp-seamless in the third input box, labeled Other tl-run-winapp-seamless args.
Command run on Windows Remote Desktop Server in Standard Mode
Select this radio button if you are adding an application that is run on a Windows Remote Desktop Server in standard mode (not in SeamlessRDP mode). Applications defined this way are run via the command tl-run-winapp.
Enter the path to the command on the Windows Server's filesystem in the Command on Server input box. If the path contains spaces, quote the entire path with double quotes.
Example:
"C:\Program Files\My Vendor\My Program.exe" %TEMP%
Choose in which application server group the command should be run in the select box labeled Application Server Group. By having several application server groups, you can have several groups of Windows servers for different purposes, with individual load balancing between the servers in each group.
It's most often recommended to hide window manager decorations, or the application will get double frames.
When running applications on a Windows server in this mode, the application gets a fixed size. The size can be set to one of fullscreen, size of desktop work area (which is fullscreen minus the area used by the window manager's taskbar), a fixed size or a percentage of the ThinLinc desktop's size.
The title of the window is by default set to the name of the executable run on the Windows server. The title can be explicitly set in the Window Title input box.
Add any arguments to tl-run-winapp in the last input box, labeled extra tl-run-winapp args.
Path to Icon file
The filename of the Icon for the application. If the icon is available in one of the directories where KDE automatically looks for icons, just the filename without the extension can be given. Otherwise, the complete path must be specified.
Command Startup Feedback
Check the box to instruct the Window Manager to show a special icon while the command is starting. Note that this does not work very well for applications run from a Windows server, so for these applications, it's recommended not to enable this functionality.
Press save when done filling the fields. The application will now show up among the other manually defined applications.
If you want to, you can add the application directly to an existing application group by checking the checkbox in front of the application name, then selecting the application group and if the application should be added to the menu or desktop of this application group, in the form at the top of the page. This can be done for both manually defined, and automatically found applications.
With TLDC, the normal menu structure as defined by the Linux Distributor or by the KDE team is not used. Instead, a new menu structure is defined. This gives more flexibility in designing menus. The TLDC administrator can fully decide where in the menu structure a certain application is placed.
To define the menu structure, click on the "Menu structure" submenu in the left pane of the TLDC administration interface. This leads to a view where a menu structure can be defined. The Root menu folder is always available and can't be removed.
Note
A menu called "Hidden Menu" is shipped with the default ThinLinc configuration. See Section 18.4.3, “ Home Icon not Working in KDE? ” for an explanation of its functionality. Please don't remove it if you are planning to use KDE.
The following properties can be edited for a menu:
Default Menu Name
This is the name of the menu, as it will be shown in the menu.
Menu Name (<language-code>)
This is the name of the menu in the language with the RFC1766 language code <language-code>. This name is shown if the locale is set to the language at runtime.
Path to Icon File
The filename of the Icon for the menu, shown to the left of the menu name in the KDE menu. If the icon is available in one of the directories where KDE automatically looks for icons, just the filename without the extension can be given. Otherwise, the complete path must be specified.
Hide This Menu
If this radio button is set to Yes, the menu will be a hidden menu. It will not be shown in the menu, but any applications that are added to this menu via an application group will be available in the KDE File Associations.
Just as for Applications, the name of the menu can be defined in several languages. The Default Menu Name is used if no language-specific name is defined, or if the locale specifies that the language is english. The list of languages that can be defined using the TLDC is found in /utils/tl-desktop-customizer/desktop_languages.
Enter the "Applications Groups" part of the "Desktop Customizer". This will present you with a list of existing application groups and their settings.
Note
An application group called "Hidden" is shipped with the default ThinLinc configuration. See Section 18.4.3, “ Home Icon not Working in KDE? ” for an explanation of its functionality. Please don't remove it if you are planning to use KDE.
Press the button "Add new group" (located at the top in the table of existing application groups) to create a new application group. This will open a rather large form, where you can define the following properties:
Name of the Application Group
This is the name of the Application Group. This is not displayed to the users, but only to the System Administrator using the ThinLinc Desktop Customizer. Set to something that reflects the contents of the Application Group.
Applications Added to Menu
First, define in the dropdown box what location in the menu structure applications choosen in the boxes below it should be added to.
Add to the left selectbox the applications that should appear in the menu folder selected above, for the users that are assigned this Application Group. The right selectbox lists the applications defined or found installed on the system. If there are no applications available, you've forgotten to define Applications, as documented in Section 18.2.5, “ Defining Application Groups ”.
Applications Added to Desktop
Add to the left selectbox the applications that should appear as icons on the desktop of the users that are assigned this Application Group. Just as for Application added to the menu, only applications earlier defined, or automatically found, will show up as selectable.
Unix Groups with this Application Group
This is where you connect Unix groups to Application Groups. If for example a specific school should be assigned this Application Group, and all the pupils of that school are members of the Unix group "school-1", add the Unix group "school-1" to the left selectbox. When logging in, the group memberships of each user is inspected to determine which Application Groups to assign to the user.
Note
If the mapping between the numerical group id and the group name doesn't work, the group is shown as #<gid>. This might be because the group has been removed from the system, or because the operating system has problems in the connection to the directory service used.
Specific Users with this Application Group
This parameter allows you to decide that specific users should be assigned this Application Group as well, even if they are not a member of one of the groups that were added above. This way, for very specialized applications, no Unix group needs to be created. Another way of using this field would be that the teachers of a specific class could be added to the Application Group for that class, if the teachers are not part of the Unix group that is associated with the class.
Note
If the mapping between the numerical user id and the user name doesn't work, the user is shown as #<uid>. This might be because the user has been removed from the system, or because the operating system has problems in the connection to the directory service used.
ThinLinc profiles with this Application Group
This setting allows you to connect the Application Group to ThinLinc Profiles as documented in Section 14.4.3, “ Profiles and the standard xstartup.default file. ”. This allows for different Application Groups to be selected based on user input after login.
Shell Command Activating this Application Group
This setting allows you to activate application groups based on the return value of an arbitrary command. If the command returns 0 (which is the standard return code for success for shell commands), the application group will be activated.
This can be used for example to activate application groups based on group membership by using the tl-memberof-group command. It can also be used to activate an application group for all users by running /bin/true as activation command.
The command is run via the shell in the current user's environment when running tl-desktop-activate.sh. The environment variable TLDCGROUP is set to the application group currently under consideration for activation.
Save!
Don't forget to press the Save-button, or none of the changes will be written to the database.
After doing changes to the Desktop Configuration, the new configuration must be copied to all VSM agent hosts. The files/directories to be copied are /opt/thinlinc/etc/conf.d/tl-desktop-customizer.hconf and all subdirectories of /opt/thinlinc/desktops.
Best Practice
Use the tl-rsync-all command as described in Chapter 13, Commands on the ThinLinc Server to copy the files.