To configure the ThinLinc client you press the button labeled "Options..." in the client window. That brings up the client options window. This window contains several pages of settings, ordered in tab sets. The following sections will describe each of these pages and all individual settings.
When a user press the OK button all the current settings in the options window is saved. For more information about the config file format, see Section 7.7, “ Client configuration storage ”.
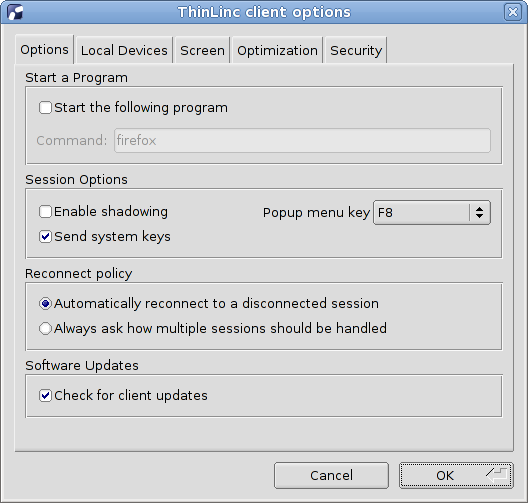
The Options tab contains general options for the ThinLinc session. This includes settings for which program to execute in the session, shadowing another users session, reassignment of session pop-up key and how reconnections are handled.
Description of options tab settings
Here follows detailed description of the settings available in the options tab.
- Start a Program
If enabled, the client requests that the server should start the session with the command supplied by the client. Otherwise, the session command is determined by the server configuration.
- Enable shadowing
When enabled, an extra text field will be present in the client main window. This field is used to enter the user name of the user whose session you want to shadow. For more information, see Chapter 15, Shadowing .
- Send system keys
When this setting is enabled and the client is in full screen mode, key combinations such Alt+Tab will be sent to the remote system instead of being handled locally. To regain access to the local system without ending the session, the menu key must be used.
- Popup menu key
During a ThinLinc session you can press a specific key to bring up the session control pop-up window. This window can for example be used to toggle to and from full screen mode and to disconnect the session. The default key for this is F8, but other keys can be configured here. The feature can also be disabled by selecting None.
- Reconnect policy
When the client connects to a ThinLinc server, there might already be multiple sessions running on it. Some of these sessions might be connected to another client, and some might be disconnected. The client can be configured to automatically handle some of these cases, or always ask the user what to do.
Note
Sessions that have been started with a command different from the one currently used will be ignored.
- Automatically reconnect to a disconnected session
If there is no disconnected session and additional sessions are allowed, create a new session.
If there is a single disconnected session, or if server allows only one session, reconnect to existing session.
Otherwise, ask how to proceed.
- Always ask how multiple sessions should be handled
If there is no running session, create a new session.
If server allows only one session, reconnect to existing session.
Otherwise, ask how to proceed.
- Software Updates
If enabled, the client will periodically query the UPDATE_URL value specified in tlclient.conf for updates. If a newer version is available, the user will be asked if they want to install it.
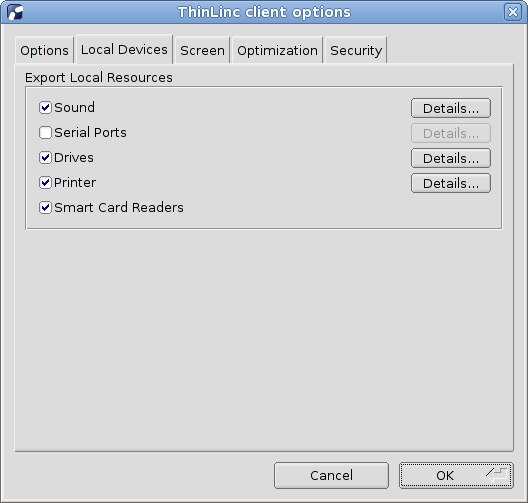
The Local Devices tab contains options for which local devices should be exported to the server and in what manner.
Description of local devices tab settings
Here follows detailed description of the settings available in the local devices tab.
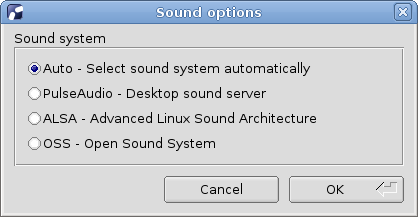
- Export - Sound Device
When enabled, sound will be sent from the ThinLinc server to your local client. A small local sound daemon will be started by the client, which connects to a secure tunnel to the server. See Section 12.3, “ Using Sound Device Redirection ” for more information about this topic.
On Linux there is a "Details..." button next to the Sound check box that will allow you to choose between PulseAudio, ALSA and OSS for the local sound system. You can also let the ThinLinc client select the correct system automatically.
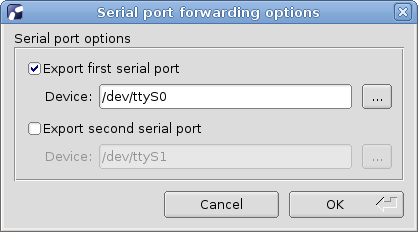
- Export - Serial Ports
It is possible to forward two serial ports from the client to make it available to programs you run on the server. To select which of your local serial devices to export you can press the "Details..." button next to the Serial Port check box. This will bring up a dialog where you can select which two serial ports should be exported.
The Device should be a path to a UNIX serial device (such as /dev/ttyS0) or a Windows COM port name (such as COM1). Enter the device to export in the text field or press the "... " button to browse to the wanted device.
- Export - Drives
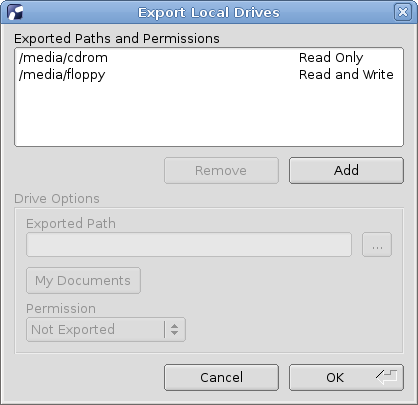
This check box turns on export of local devices from your terminal top the ThinLinc server. This makes your local drives available from your ThinLinc session. To select which drives to export you press the "Details..." button next to Drives check box. That presents a dialog where you can build a list of drives to export and set export permissions.
The Export Local Drives window consists of two parts. At the top there is a list containing exported paths, with two control buttons below. The lower half contains settings fields for the currently selected path. When you select a path listed in the upper list you will see its corresponding settings in the Drive Options field below. You can then change the selected path by changing the values on the options field.
To add a new path to the list you press the Add button. That creates a new empty land in the path list. The new path will be automatically selected. you can then modify the settings in the lower half. Set the path and export permission for the new export. To set the export path you can either write it manually in the path text field or press the "..." button to bring up a file navigation window.
To remove a path you simply select a path and press the Remove button.
The Windows client features a mechanism that makes it easy to export the "My Documents" folder. This feature is activated by pressing the "My Documents" button. Regardless of the local folder name, this folder will be mounted as "MyDocuments" on the server.
The export permissions can be one of the following three options, Not Exported, Read Only and Read and Write. The Not Exported option can be used to temporarily turn off an export without having to delete it. The Read Only option means that you from the ThinLinc session will be able to read from the export, but not write. The Read and Write option means that you from the ThinLinc session will be able to both read and write.
- Export - Printer
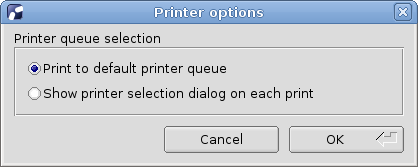
By checking this check box the client will export your local printer to make it available from the ThinLinc session. For more information about this feature, see Section 7.3.4, “ Printer ” and Section 5.3, “ Local printer support ”.
On Windows and MacOS there is a "Details..." button next to the Printer check box that will allow you to select if the print job should be sent to the default printer or if the printer selection dialog should be used on every print.
- Export - Smart Card Readers
This check box makes all local smart card readers and smart cards available to applications on the ThinLinc server. It is not necessary to check this box to authenticate using smart cards, but it is needed if you also wish to authenticate using smart cards to a Windows Remote Desktop Server.
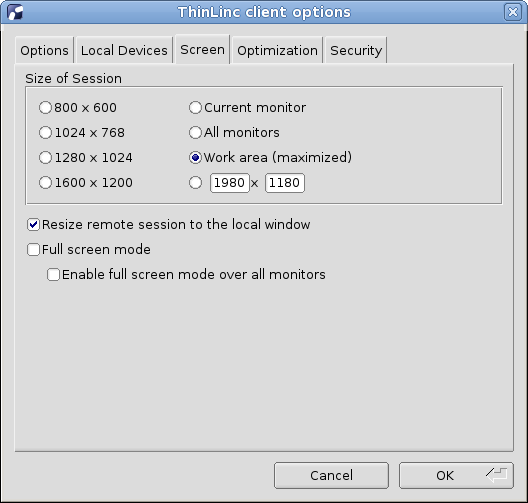
The "Screen" tab contains options regarding the session screen. This includes initial screen size, resize behaviour and full screen mode.
Description of screen tab settings
Here follows detailed description of the settings available in the screen tab.
- Size of session
In this box of radio buttons you can select the screen size you want for your ThinLinc session. The first five options are static with four very common screen sizes (800*600, 1024*768, 1280*1024 and 1600*1200).
The option Current monitor makes the ThinLinc session just as large as the monitor that the main client window is currently on. This can be used to run ThinLinc in full screen mode on one monitor, whilst retaining access to the local desktop on the other monitors.
The option All monitors makes the session large enough to cover all available monitors. This is a good choice when using full screen mode.
The options All monitors and Current monitor are identical if there is only a single monitor connected.
The option Work area (maximized) makes the ThinLinc session size suitable for a maximized window.
The final possible size option is to manually enter the wanted width and height. The two text boxes close to the last radio button is supposed to contain the width and the height of the wanted session as numbers. These numbers must be larger than 128 and not larger than 16384.
- Resize remote session to the local window
This option makes the remote session follow the size of the local ThinLinc Client window. If the local window is resized, the remote session will be adjusted to match. If this option is disabled, or if the server is too old, padding or scroll bars will be added as needed when the remote session does not match the size of the local window.
- Full screen mode
This option enables full screen mode during sessions. That means that the ThinLinc session will cover all of the screen area. If the session is smaller than your screen resolution, there will be black borders around your session which will be centered on the screen. If you run in full screen mode and want to reach the native session that is hidden by the ThinLinc session you can switch out from full screen mode. To do this you press the key assigned to bring up the session pop-up menu. Normally this menu is bound to the F8 key, but can be manually changed. See the Popup menu key setting on the Options tab above for more information on this. In the session menu you should select Full screen to toggle full screen mode.
- Enable full screen mode over all monitors
This option controls if full screen mode should use just the current monitor, or all monitors connected to the local client.
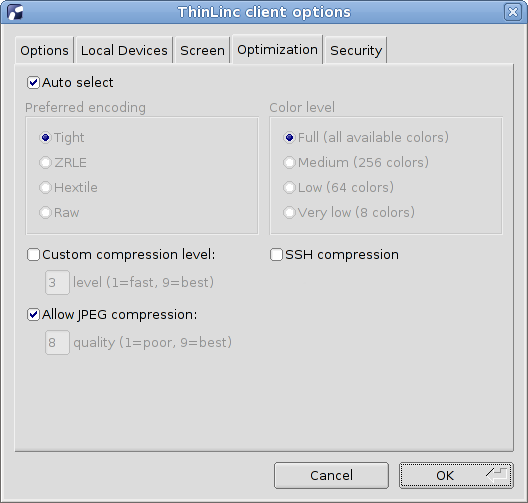
The "Optimization" tab contains various settings that affects the protocols used to transfer the graphic information. This includes algorithm used for the graphic encoding. The best choices may differ from case to case. Factors that affects the algorithm choices can for example be network bandwidth, network latency, and client computer performance.
The default setting is to use the Auto select mode, to automatically select the best suited algorithms.
Description of optimization tab settings
Here follows detailed description of the settings available in the optimization tab.
- Auto select
This option makes the ThinLinc system try to automatically select the best suited encoding algorithm. The network performance is measured during the life of the connection and the encoding options are adjusted based on the results. This means that the encoding options can be changed automatically during the connection, if the network performance changes. Activating this option will "gray out" the Preferred encoding and Color level options, to show that they aren't manually controlled.
- Preferred encoding
This block of settings affects the VNC protocol encoding. There are several different ways to compress and encode the graphic data that is sent from the server to your client. In this box you select one of four possible encodings. The methods differ much: Some try to use smart algorithms to select and compress the areas to send, which means slightly higher CPU usage, but most likely less bandwidth usage and faster sessions where the bandwidth is limited. Other methods use less CPU capacity but more network bandwidth. The best choice can vary much depending on place and situation. A safe choice is to let the system automatically select the best encoding by checking the Auto select checkbox above.
- Encoding: Tight
This choice selects the Tight encoding method. With this encoding the zlib compression library is used to compress the pixel data. It pre-processes the data to maximize compression ratios, and to minimize CPU usage on compression. Also, JPEG compression may be used to encode color-rich screen areas. The zlib compression level and the JPEG compression ratio can be manually changed. See Custom compression level and Allow JPEG compression below. Tight encoding is usually the best choice for low-bandwidth network environments (e.g. slow modem connections).
- Encoding: ZRLE
This choice selects the ZRLE encoding method.
- Encoding: Hextile
This choice selects the Hextile encoding method. With Hextile the screen is divided into rectangles, split up in to tiles of 16x16 pixels and sent in a predetermined order. Hextile encoding is often the best choice for using in high-speed network environments (e.g. Ethernet local-area networks).
- Encoding: Raw
This choice selects the Raw encoding method. This is the simplest of the encoding methods. It simply sends all the graphic data of the screen, raw and uncompressed. Since this method use the least processing power among the possible methods this is normally the best choice if the server and client runs on the same machine.
- Custom compression level
By selecting this option you choose to override the standard compression level used when compressing data with the Tight encoding. You can manually select the wanted compression level by entering a number between 1 and 9. Level 1 uses a minimum of CPU performance and achieves weak compression ratios, while level 9 offers best compression but is slow in terms of CPU consumption on the server side. Use high levels with very slow network connections, and low levels when working over high-speed network connections. This applies to the Tight encoding only!
- Allow JPEG compression
By selecting this option you choose to override the standard JPEG compression quality of color-rich parts of the screen. JPEG is a "lossy" compression method for images that helps the Tight encoding to significantly reduce the size of the image data. The drawback is that the resulting image, depending of selected compression ratio, can be blurred and grainy. You can manually select the wanted image quality by entering a number between 0 and 9. Quality level 0 gives bad image quality but very impressive compression ratios, while level 9 offers very good image quality at lower compression ratios. Note that the Tight encoder uses JPEG to encode only those screen areas that look suitable for lossy compression, so quality level 0 does not always mean unacceptable image quality.
- Color level
This block of choices selects the number of colors to be used for the graphic data sent from the server to the client. The setting has four levels, Full, Medium, Low and Very low. The default and normal is to use the Full setting. Selecting a lower number of colors will highly affect the resulting image to the worse, but may also speed up the transfer significantly when using slow network connections.
In this context, Full means the number of colors supported by the clients graphics hardware.
- SSH compression
This choice selects whether or not to use SSH compression for all the data sent between ThinLinc server and client. This is normally not used since an extra compression step, above a compressing graphic encoding normally doesn't help making it smaller, only use more CPU performance. There can still be occasions where this is worth trying though. It is possible that this can help speeding up printing or other exports over slow connections.
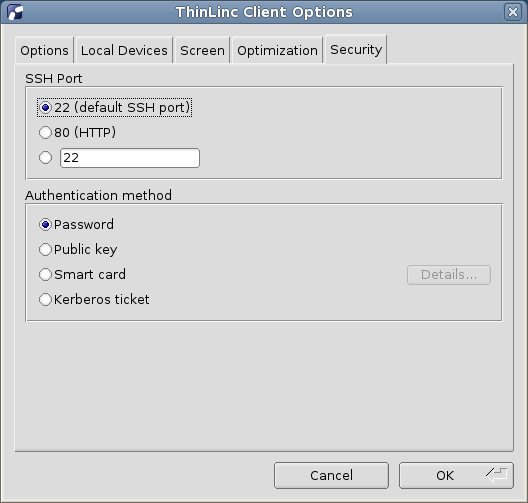
The "Security" tab controls how the client authenticates against the ThinLinc server. The main interface of the client will be different depending on the choices made here.
Description of security tab settings
Here follows detailed description of the settings available in the security tab.
- SSH Port
This option selects the TCP/IP port to use when the client tries to establish an SSH connection with the ThinLinc server. The normal SSH port is 22, which also is the default selection for this option. There can be reasons to use another port on some occasions. If you for example need to use ThinLinc over the Internet, from a location where port 22 is blocked by a firewall. Then you can select a port that is let open. Port 80 which is used for HTTP, the protocol used for transport when surfing the WWW is one port that often is open. To be able to use a port other than 22 you need to make sure that the SSH daemon (sshd), which runs on the ThinLinc server, listens to the port you want to use. The SSH daemon can be told to listen to any wanted ports. In the client interface you can select between the default port 22, port 80 and an arbitrary port number which you can enter by yourself.
Note about SSH host key updates
If the SSH host key on the server changes, e.g. due to an upgrade of the OS or SSH server software, the client will note this fact. It will then, at the next login, open a dialog and let the user confirm that the new host key is valid. If the user clicks , then the host key on the client for this particular server is updated on disk.
The administrator can disallow this by manually setting the parameter ALLOW_HOSTKEY_UPDATE to 0. See Section 7.7, “ Client configuration storage ” for more information.
- Password
This option makes the client try to authenticate using a regular password.
- Public key
This option makes the client try to authenticate using public key encryption. The user will be asked to provide a private encryption key instead of a text password.
- Smart card
This option makes the client try to authenticate using public key encryption, but with the private key securely stored on a smart card. The user will be asked to select a certificate on the smart card and to provide the passphrase for it.
Note
Smart card authentication requires that the smart card is readable by your PKCS#11 library. The library included by default supports PKCS#15 compliant smart cards and relies on the PC/SC interface. This is always present on Windows systems and is usually installed by default on Linux systems.
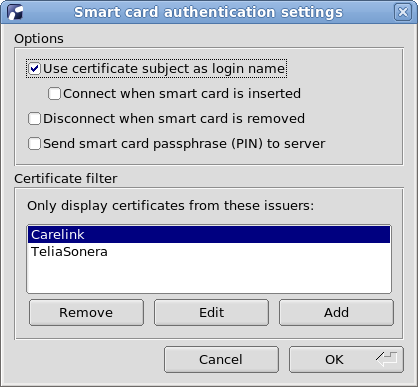
The "Details..." button lets you change the options for smart card usage and managing the certificate filters which are used to match accepted certificates for authentication.
- Use certificate subject as login name
Enable this options if you want to enable automatic login, this will also hide the input box for login name from user.
- Connect when smart card is inserted
This options will try to automatic connect and is dependent on certificate filters, automatic connect will only occur if only one certificate is available after the filtration.
Read more about automatic connection below where certificate filters is discussed.
See Section 9.4.6, “ Automatic Connection ” for information on how to configure the server for automatic smart card connection.
- Disconnect when smart card is removed
Enabling this options makes the client automatically disconnect when the smart card used to authenticate is removed.
- Send smart card passphrase (PIN) to server
This option makes the client transmit the smart card passphrase, as entered by the user, over to the ThinLinc server. It is required to enable smart card single sign-on.
Warning
Enabling this option reduces the security of the smart card as the passphrase would otherwise never leave the client system. The option should be left disabled if smart card single sign-on is not used.
Smart card - certificate filter
A certificate filter is used to present only allowed certificates for authentication, certificates that does not match any filter will be hidden from the user.
When no certificate filters are configured, all available certificates on the smart card will be available for authentication and therefore the autoconnect feature will not work.
If the resulting filtered list of certificate evaluates only one certificate for authentication and the autoconnect feature is enabled, it will be used for authentication.
When the login dialog is displayed and the key shortcut control-shift-F8 is pressed, the certificate filtering functionality is bypassed and gives you access to all certificates available on the smart card for authentication.
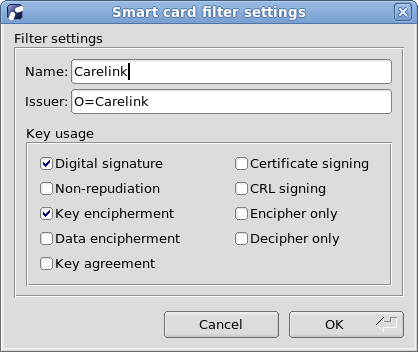
To add a new filter just press the add button as shown in dialog Figure 7.12 or select an available filter item in the lsit and press edit to change the settings for specific filter. Either way, the certificate filter settings dialog Figure 7.13 will be shown where you can modify the settings of the specific filter.
- Name
Enter name of the filter that will be seen in the list of filters.
- Issuer
The certificate issuer field consists of a comma separated list of attribute-value pairs that all must be present in the certificate issuer field. Commonly the "common name" of the issuer is used, e.g. "cn=My CA". It is also possible to allow any issuer that are part of the same organisation, e.g. "o=My Company Ltd.". Any registered object identifier descriptor can be used as an attribute name (see IANA for a full list).
- Key usage
The certificate must have all the key usage bits selected in this window. Having more bits than those selected does not exclude a certificate.
- Kerberos ticket
This option makes the client try to authenticate using an existing kerberos ticket.
Note
This requires that a valid kerberos ticket is available on the client, and that the SSH daemon on the ThinLinc server is configured to accept this ticket during authentication. For information about how to configure kerberos authentication on your particular platform(s), please see the relevant vendor documentation.